Tutorial 09: N-Sim
N-Sim (Nested Grids Simulation) allows you to optimize memory usage and simulation speed where smoke flow has two (or more) distinctive regions.
For this tutorial please load Tut_09_start.ma from your [MAYA]/FumeFX/Tutorials folder in your Maya session.
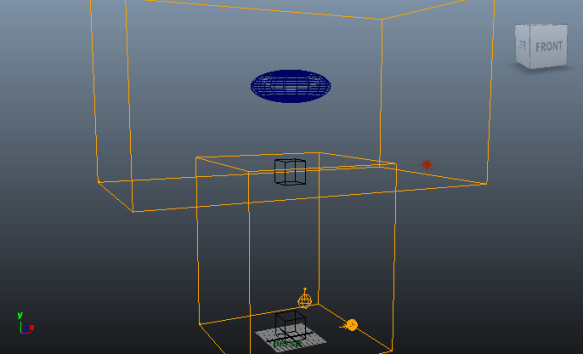
This scene contains a short animation; a simple source is emitting fire and smoke while rising towards a large deflecting ellipsoid. The first part of the animation (rising of the simple source) is mostly vertical and doesn't require wide simulation grid. On the other hand, the second part of the simulation (deflecting ellipsoid) does require a wide grid, but it occupies only part of the animation space. Normally you would be forced to use a grid tall enough for first part of the animation, and wide enough for the second part, resulting in a very large grid, most of which you don't really use. But with N-Sim you can respond to such challenge and create two smaller FumeFX Grids; a taller one and a wider one, and achieve gains in simulation speed and space usage.
Select "Master Grid". Set Spacing to 0.6, Sensitivity type to Velocity.
Under the Simulation->Fuel rollout set Fire expansion to 0.5. Turn on Fire Creates Smoke and set Smoke Density to 1. Inside the Rendering Settings->General Parameters rollout enable Use Maya Volume Sampling. Enable Cast Shadows and Receive Shadows in Smoke rollout.
Create one Point Light in the scene, position it to (75,75,0) coordinates. Within the light's rollouts, enable Use Ray Trace Shadows.
Inside FumeFX Relationship Manager select pointLight1 and ffxSimpleSource1.
Now create a second FumeFX Grid so that it encapsulates deflecting motion from ellipsoid. Suggested values for Width/Length/Height are 150/80/80 and for position 0/70/0. Rename the grid to "SlaveGrid" and set Spacing to 0.6. Open its Attribute Editor and select ffxSimpleSource1, pSphere1_collision and pointLight1. Note that you don't need to add the ellipsoid to Master Grid as the ellipsoid is located outside its volume. We will want this grid to alwsy display inside the viewport, so please enable Display Always option.
Now select MasterGrid and open the simulation rollout. Enable the Use for N-Sim, Master Grid, and enable all buttons for N-Sim Syncing. You can select all of them by holding the Shift key and left mouse clicking on any button.
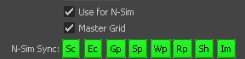
This is practical in our setup because we don't need to repeat setting parameters for Slave Grid; any parameter change in the Master Grid will be changed in the Slave Grid as well. Please note that parameters are not propagated immediately, but when simulation starts. Select Slave Grid and enable Use for N-Sim (it is not necessary to enable N-Sim Syncing options for the Slave Grid).
Identical grid spacing values are required for the best results (0.6 in this scene). Different values could result in visible artifacts in the overlapping area.
Smoke plumes with lots curling around the boundary area could result in the ???bounced??? smoke that will stay there for a long period of time.
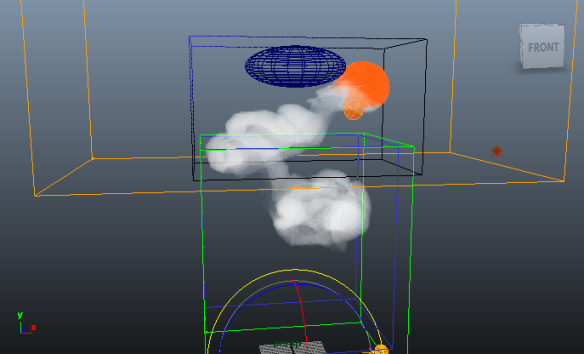
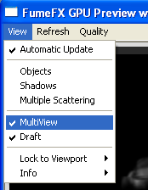
Select Master Grid, change Output End Frame to 100 and Playback Play To to 100 and simulate first 100 frames. While simulating open the preview window and select View>MultiView. This will allow us to see caches from all FumeFX Grids in one place.
Looking at the simulation result, it is almost impossible to tell that those are two different FumeFX grids merged into one larger simulation.